 5 containers for minimizing/mitigating risk


Different leadership styles
Summer 2018, Train the Trainer
“How to teach better, safer, fun’er”’
Safer:
5 tools to help ‘contain’ the day’s activities for us
The broadest one is a placement of the activity on a probability of occurrence versus severity of injury graph. Golf is low probability of injury and low severity of possible injury. Road cycling is is more like moderate probability and high severity of injury if it happens. So realizing this is the first step, be sharp, focused, attentive and proactively take care of your students. This isn’t soccer or any other field sport, so we have to be more alert especially on the road.
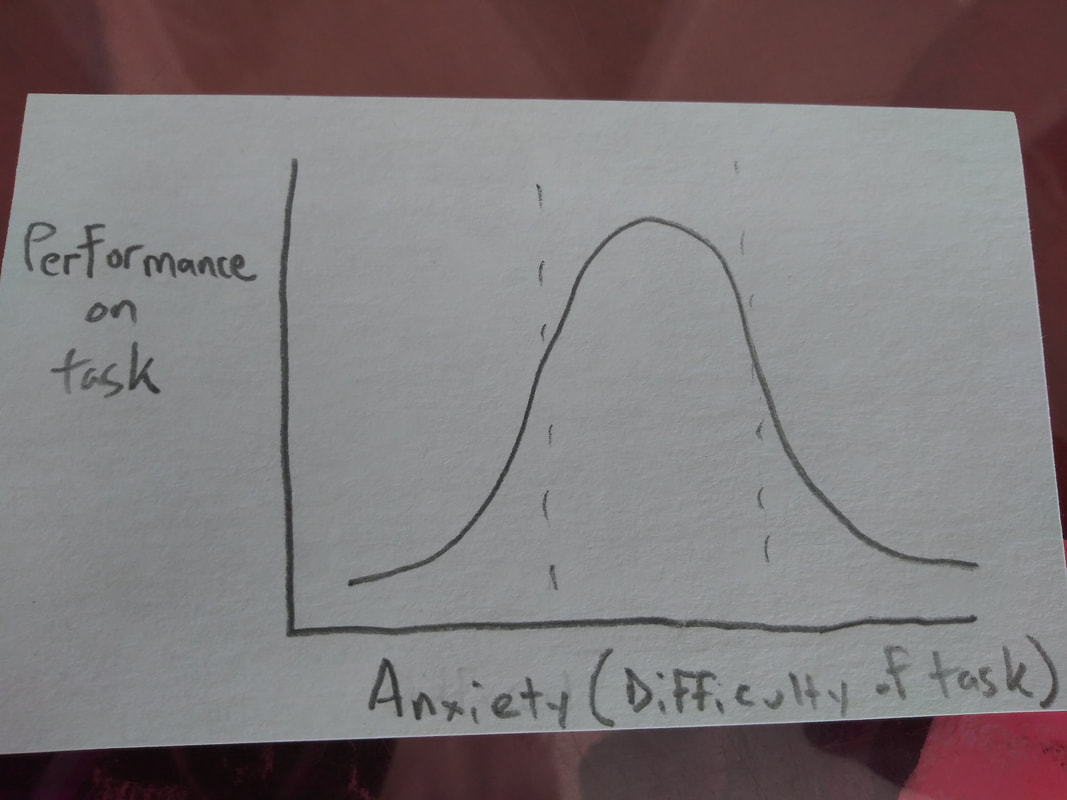
The next way to contain the activity to limit risk, is to consider how it is that you can teach what people will need to know on the road. Plotting anxiety versus performance, we see a bell curve. So from no anxiety to moderate, we can meet that challenge and our performance increase with the increasing anxiety, but, we are human, and a some point too much anxiety causes our decreased ability to perform. So, realizing this when we teach is very important to have students be able to learn what we are trying to teach. So aim for not boring not scary, but in the middle, stimulating. Also this is helpful to know once you begin teaching you can see where people are individually on this graph and ask those that appear comfortable/unchallenged to try a drill faster, such as the quick stop etc...
The next tool helps us prepare our students for what they are going to face on the road. It is the idea of stationary sites (SS) versus moving sites (MS). A stationary site is a physical site in which you can control all variables, such as blocking off an area a blacktop at a school and showing how to do a quick stop. A moving site is one in which you can't, such as riding with cars on a roadway, its a moving site because you can't control the other divers. So then the idea here is to not have your students face a new challenge in a moving site, that they could have been exposed to in a stationary site you made for them. For example, riding a steep downhill, the first time your students ride a steep downhill, shouldn’t be when they have other drivers, cars, bike, joggers, around them. Ideally, you are able to physically block off a section of a steep downhill and introduce how to ride it in a more of a stationary site. For hills this is hard, but turns, looking over shoulder, signaling, quick stops, train track crossing, rock/debris dodge, etc...this is easy to do.
The next tool that narrows down the risks we are exposed to is a stop light. Yes, a simple green, yellow, red light traffic signal that I consider when doing the activity. The idea behind this tool is that it helps us to not take on too much uncertainty/risk on an endeavor. So this is how it works, we evaluate riders, route and ‘raffic (traffic). So for example you feel very soldi about managing your riders ---they have shown all the skills needed for their route proficiently, you have a small group, say only 4..so you’d decide your riders are a green light. Then look at your route --- in this case say its pretty challenging, its got some downhills and some narrow shoulders, left turns without a arrow, etc.. so this could be a yellow light. Lastly consider the traffic, is it lighter, heavier, faster etc..than you had anticipated from scouting it. After you’ve consider each of these three, riders, route, and traffic, and given then a gut feeling red, green, or yellow light, the idea is if you have a red light or even 2 yellows you don’t proceed. Instead you change something to make less your three light be at most 1 yellow, so usually that means teach more, or amend the route.
The last way to think about containing the activities of the day is a mnemonic that helps you as you are do and transition from one activity to another. CLAP, is the mnemonic and C stands for communication. Let others, your students, co- instructors, know what your plan is/what’s going on --- especially at transitions (moments when you have changed your mind from what you told and others expected you were going to do). L stands for line of sight, meaning be where you can see what’s going on whether its teaching a skill, or out on a road. Be where you can see the most of what’s most important to see:) A is for assess/anticipate/avoid...assess- how its going--is this what i expected? Anticipate-this is where i need to pull over an teach, or check in with with this person bc of what i’m seeing… and avoid, if something is too much avoid it. Our goal is a fun day with as much learning crammed in as possible. So trying to teach too much at the expense of students enjoyment is most likely a bad tradeoff and definitely challenging someone to the point of them getting overwhelmed bc of skill or route is a mistake. P is position, be in a position you can help/ see/teach from. Again, CLAP really helps when transitioning from one activity or version of an activity you had planned to another.
Better:
3 Concepts that help us teach better.
1. Start and end with a circle. Start your on the bike class, when possible, by circling all folks up and doing your intro. Creating a physical circle with your group creates a feeling of safety and inclusivity. This sets the and that helps when new people are trying to learn new riding skills. Closing with a circle again reinforces this same feeling and shows inclusion. In addition when closing if you have people contact each other, such as turn to your left and stick out your right hand, now pat the right shoulder of the person in front of you while saying “NIce job today!” Again, in my experience, closing that has contact, like this or handing away key concepts/objects as in the game ‘red rubber ball’ we have played, is very effective at closing a group experience.
We did also at this point talk about some icebreakers. Starting by sharing your experience as cycling instructor, and expectations on the day, and asking to go around the circle so ppl can share. I like to include something fun here that people do, not just say. For example step left if “I” is said, and wave is bike/bicycle/bicycling is said. In my experience, this exercise is useful bc it shows we are going to try some new things and were all in it together and getting it ‘wrong’ doesn’t matter, we’ll just laugh and try to get it right next time, and it gets people moving, which I think is an effective icebreaker.
2. We talked about different leadership styles next. If you graph level of group involvement (X axis) based off level of group ownership/ time to make decision (Y axis) we create 3 zones. The first one, is the directive zone, with low group ownership/ time to make decision and a corresponding low level of group involvement. At times this style is necessary such as when deciding not to ride a particular roadway bc too high traffic. what skills your riders need to continue to work on, what route you’re going to ride. The next zone is called the consultative and is characterized by a moderate level of group ownership/ time to make decision and a resulting corresponding moderate level of group ownership. An example here is when you could list the skills your group gets to vote on in order to use the time you have on the bike with them. The next region is found when a lot of group ownership/ time to make decision which yields a corresponding high amount of group ownership. The last zone is the voting zone, which has the highest group ownership/ time to make decision and brings you the highest level of group ownership. An example here could be when you choose to let the group vote on giving the skateboarders half of what you anticipated would be your bike practice space. You do this so they buy in to the decision and presumably won’t complain in moments its clear physically that the skateboarders are in ‘the the bike space.” Instead of complaining, your bikers feel a sense of power and generosity in that they elected to give the skaters space.
3. Teach concepts using the iDeAfs method. “I” is for introduce the idea, why it matters they learn it. “D” is for demonstrate the skill. It is capitalized because this should take more time than the other letters aside from the “A.” “e” is for explain, after you demonstrated it, make sure to explain what it is you did/how to do it. “A” stands for make an activity where they try the skill. “A” is capitalized because this is where most of the time dedicated to this skill learning/practicing should be allocated. “f” is for feedback, provide coaching here. Lastly the “s” if for summarize, briefly circle back reviewing the iDeAfs for that skill.
“How to teach better, safer, fun’er”’
Safer:
5 tools to help ‘contain’ the day’s activities for us
The broadest one is a placement of the activity on a probability of occurrence versus severity of injury graph. Golf is low probability of injury and low severity of possible injury. Road cycling is is more like moderate probability and high severity of injury if it happens. So realizing this is the first step, be sharp, focused, attentive and proactively take care of your students. This isn’t soccer or any other field sport, so we have to be more alert especially on the road.
The next way to contain the activity to limit risk, is to consider how it is that you can teach what people will need to know on the road. Plotting anxiety versus performance, we see a bell curve. So from no anxiety to moderate, we can meet that challenge and our performance increase with the increasing anxiety, but, we are human, and a some point too much anxiety causes our decreased ability to perform. So, realizing this when we teach is very important to have students be able to learn what we are trying to teach. So aim for not boring not scary, but in the middle, stimulating. Also this is helpful to know once you begin teaching you can see where people are individually on this graph and ask those that appear comfortable/unchallenged to try a drill faster, such as the quick stop etc...
The next tool helps us prepare our students for what they are going to face on the road. It is the idea of stationary sites (SS) versus moving sites (MS). A stationary site is a physical site in which you can control all variables, such as blocking off an area a blacktop at a school and showing how to do a quick stop. A moving site is one in which you can't, such as riding with cars on a roadway, its a moving site because you can't control the other divers. So then the idea here is to not have your students face a new challenge in a moving site, that they could have been exposed to in a stationary site you made for them. For example, riding a steep downhill, the first time your students ride a steep downhill, shouldn’t be when they have other drivers, cars, bike, joggers, around them. Ideally, you are able to physically block off a section of a steep downhill and introduce how to ride it in a more of a stationary site. For hills this is hard, but turns, looking over shoulder, signaling, quick stops, train track crossing, rock/debris dodge, etc...this is easy to do.
The next tool that narrows down the risks we are exposed to is a stop light. Yes, a simple green, yellow, red light traffic signal that I consider when doing the activity. The idea behind this tool is that it helps us to not take on too much uncertainty/risk on an endeavor. So this is how it works, we evaluate riders, route and ‘raffic (traffic). So for example you feel very soldi about managing your riders ---they have shown all the skills needed for their route proficiently, you have a small group, say only 4..so you’d decide your riders are a green light. Then look at your route --- in this case say its pretty challenging, its got some downhills and some narrow shoulders, left turns without a arrow, etc.. so this could be a yellow light. Lastly consider the traffic, is it lighter, heavier, faster etc..than you had anticipated from scouting it. After you’ve consider each of these three, riders, route, and traffic, and given then a gut feeling red, green, or yellow light, the idea is if you have a red light or even 2 yellows you don’t proceed. Instead you change something to make less your three light be at most 1 yellow, so usually that means teach more, or amend the route.
The last way to think about containing the activities of the day is a mnemonic that helps you as you are do and transition from one activity to another. CLAP, is the mnemonic and C stands for communication. Let others, your students, co- instructors, know what your plan is/what’s going on --- especially at transitions (moments when you have changed your mind from what you told and others expected you were going to do). L stands for line of sight, meaning be where you can see what’s going on whether its teaching a skill, or out on a road. Be where you can see the most of what’s most important to see:) A is for assess/anticipate/avoid...assess- how its going--is this what i expected? Anticipate-this is where i need to pull over an teach, or check in with with this person bc of what i’m seeing… and avoid, if something is too much avoid it. Our goal is a fun day with as much learning crammed in as possible. So trying to teach too much at the expense of students enjoyment is most likely a bad tradeoff and definitely challenging someone to the point of them getting overwhelmed bc of skill or route is a mistake. P is position, be in a position you can help/ see/teach from. Again, CLAP really helps when transitioning from one activity or version of an activity you had planned to another.
Better:
3 Concepts that help us teach better.
1. Start and end with a circle. Start your on the bike class, when possible, by circling all folks up and doing your intro. Creating a physical circle with your group creates a feeling of safety and inclusivity. This sets the and that helps when new people are trying to learn new riding skills. Closing with a circle again reinforces this same feeling and shows inclusion. In addition when closing if you have people contact each other, such as turn to your left and stick out your right hand, now pat the right shoulder of the person in front of you while saying “NIce job today!” Again, in my experience, closing that has contact, like this or handing away key concepts/objects as in the game ‘red rubber ball’ we have played, is very effective at closing a group experience.
We did also at this point talk about some icebreakers. Starting by sharing your experience as cycling instructor, and expectations on the day, and asking to go around the circle so ppl can share. I like to include something fun here that people do, not just say. For example step left if “I” is said, and wave is bike/bicycle/bicycling is said. In my experience, this exercise is useful bc it shows we are going to try some new things and were all in it together and getting it ‘wrong’ doesn’t matter, we’ll just laugh and try to get it right next time, and it gets people moving, which I think is an effective icebreaker.
2. We talked about different leadership styles next. If you graph level of group involvement (X axis) based off level of group ownership/ time to make decision (Y axis) we create 3 zones. The first one, is the directive zone, with low group ownership/ time to make decision and a corresponding low level of group involvement. At times this style is necessary such as when deciding not to ride a particular roadway bc too high traffic. what skills your riders need to continue to work on, what route you’re going to ride. The next zone is called the consultative and is characterized by a moderate level of group ownership/ time to make decision and a resulting corresponding moderate level of group ownership. An example here is when you could list the skills your group gets to vote on in order to use the time you have on the bike with them. The next region is found when a lot of group ownership/ time to make decision which yields a corresponding high amount of group ownership. The last zone is the voting zone, which has the highest group ownership/ time to make decision and brings you the highest level of group ownership. An example here could be when you choose to let the group vote on giving the skateboarders half of what you anticipated would be your bike practice space. You do this so they buy in to the decision and presumably won’t complain in moments its clear physically that the skateboarders are in ‘the the bike space.” Instead of complaining, your bikers feel a sense of power and generosity in that they elected to give the skaters space.
3. Teach concepts using the iDeAfs method. “I” is for introduce the idea, why it matters they learn it. “D” is for demonstrate the skill. It is capitalized because this should take more time than the other letters aside from the “A.” “e” is for explain, after you demonstrated it, make sure to explain what it is you did/how to do it. “A” stands for make an activity where they try the skill. “A” is capitalized because this is where most of the time dedicated to this skill learning/practicing should be allocated. “f” is for feedback, provide coaching here. Lastly the “s” if for summarize, briefly circle back reviewing the iDeAfs for that skill.
FAQ’s/ Past class curveballs and possible solutions
-many of these can be avoided by communicating with the venue host when the lead LCI for the event contacts the venue host few days before the event.
Conundrums: Not enough space at venue for what you had planned, no bathroom, no electricity for powerpoint, no attendance, worse case scenario, pavement is wet or has huge puddles
Problem: Not enough space at venue for what you had planned...
In all of these, first make sure by asking venue host and neighbors if can use the space you have in mind. Also, ask your fellow LCI’s working with you, more brains are better than 1:)
-many of these can be avoided by communicating with the venue host when the lead LCI for the event contacts the venue host few days before the event.
Conundrums: Not enough space at venue for what you had planned, no bathroom, no electricity for powerpoint, no attendance, worse case scenario, pavement is wet or has huge puddles
Problem: Not enough space at venue for what you had planned...
- find a nearby area: we have used 2 floors in a private parking garage; we have used tennis courts at the park where we were supposed to have the parking lot; we’ve used a small sections of a grassy area so people could turn around on their bikes and ride the straight sections on the tiny bit of pavement we had; we have cleaned up an alley way and used it for narrow lane drills:); we have found a adjacent cul de sac in a neighborhood and used it for lane drills...
- do more off the bike (intersections) and just do essentials(lane drills) on the bike
- do more extra demonstrations: helmets, ABCQ, locking, bike fit/adjustments, repairs can all happen in a small space
- rotate groups through stations..for example at a FCW say you have 4 family groups and you had planned on doing 4 lane drills, but you don't have the space for 4 drills because half the blacktop is a huge rain puddle. Here you can rotate families through 1 lane drill area while others do helmet/abcq/bike fit/flat fix and another station with intersection practice for kids involving parents as car car drivers, and lastly a station of squiggly course or chaos box
- negotiate with nearby spaces/users of those spaces: skateboarders at the RockRidge Bart, ask the event coordinators for more space/amended space
- when you have a public park bathroom as the bathroom for your venue, being prepared to go buy supplies--soap and toilet paper--or better yet bring these has helped in the past, so if you’re the lead, show up a few min early and check this.
- find nearby facilities, one instructor can ride around looking for possible bathrooms while other LCIs deal with class
- check Google maps, oddly, you can Google public bathrooms on Google maps
- check your with the contact host for the venue, if that doesn’t work yield any results try looking through your paperwork and call the call the agency that issued the permit for the rental facility-- school district, park district, local gov’t department etc...
- let folks know and ask for help, managing students expectations is big part of handling this well---they’ll understand to some degree, everyone’s been there. Plus, letting people know this will usually solicit help from an IT savvy attendee, this has super helpful a few times in the past.
- check your with the contact host for the venue
- if no screen, to project image, get creative, you have not much to loose:) A light colored wall, the blank side/reverse of a poster taken off the wall, or go off your laptop and make it more hands on--hopefully you have a bike, or can borrow and attendees.
- no audio, you can speak that points that you want to convey when the videos play
- at a recent FCW in Alameda, we used brooms to sweep the water around to first, thin the puddles, then swept them again to allow them to evaporate---this of course was on a day that called for a slight chance of showers and we did this in mostly sunny conditions
- at a FCW in Castro Valley we once avoided the puddles by making 3 small dry stations and 1 larger station...3 small dry islands consisted of: 1. a wandering squiggly course that dodged the puddles; 2. a helmet and ABC station; 3. A walking 4 way intersection and the larger station was a longish land drill area. We rotated the families through these stations.
In all of these, first make sure by asking venue host and neighbors if can use the space you have in mind. Also, ask your fellow LCI’s working with you, more brains are better than 1:)
